2 posts tagged with "event driven architectures"

View All Tags

· 7 min read
Sam Sussman

Open AI plugins are an exciting new way of exposing APIs to end consumers. For decades we’ve mostly exposed APIs programmatically or via some form of graphical UI. With the advent of AI, we now have a new form factor emerging - conversational AI. Examples include Open AI Plugins (aka. GPT Plugins) and LangChain.

This new form factor uses conversation to interact with APIs. A smart agent backed by LLMs then works to serve your requests by selecting APIs from a catalog and calling them on your behalf. Instead of pointing and clicking - you just say what you need done and the bot will work to achieve your request by calling APIs step-by-step.

tip

You can find the example code for this blog post here in our example repos.

Video

Building GPT plugins requires three things:

  1. An API hosted somewhere on the internet
  2. An Open API specification describing the API’s operations in detail.
  3. An Open AI Plugin Manifest file served over HTTP

This Open API specification part is super important - because without a well documented or spec’ed out API, the smart agents cannot reason about when or how to call your API. o dive more into details visit the Open AI getting started guide.

Eventual’s cloud framework makes building plugins dead simple thanks to its abstractions of AWS serverless and Open API. With just a few lines of code, you can have an API deployed on AWS and a well documented API specification available for the plugins.

The rest of this blog will walk through the noteworthy steps in building a plugin with eventual. To skip straight to the code - see this example.

First, if you haven’t already, bootstrap a new eventual project (see the Getting Started guide).

pnpm create eventual@latest

This will create you a new repository with an eventual project ready to go.

Next, head on over to your service’s NPM package in packages/service. Here we’ll find some sample code that we can just delete.

Now, the simplest GPT plugin has a single API that can be called. To create APIs with eventual, we simply import the command primitive and create a new API.

import { command } from "@eventual/core";

export const helloWorld = command(
"helloWorld",
{
path: "helloWorld/:name",
},
async (request: { name: string }) => {
return { message: `hello ${request.name}` };
}
);

Now, this is the simplest command possible, but it’s not yet enough for building GPT plugins because we have not defined its schema and documented it for generating the Open API spec.

To do that, we import zod and use that to define the input/output schema of the command. This is good practice anyway, regardless of whether you’re onboarding with GPT plugins, because it is used to validate the request to ensure the data matches what you expect.

import { z } from "zod";

const HelloInput = z.object({
name: z.string()
});

const HelloOutput = z.object({
message: z.string()
});
export const helloWorld = command("helloWorld", {
path: "helloWorld/:name",
input: HelloInput,
output: HelloOutput
}, async (request) => {
return `hello ${request.name}`.
});

We now have an API with request validation and Open API schema generation.

The next step is to document the properties with information that will be read and reasoned over by the smart agents. Unfortunately, this requires that we install an external dependency on @anatine/zod-openapi.

pnpm add @anatine/zod-openapi

We then import the extendApi method from that package. This function decorates zod schemas with with metadata specifical to Open API.

const HelloInput = z.object({
name: extendApi(z.string(), {
description: "name of the person to say hello to",
}),
});

const HelloOutput = z.object({
message: extendApi(z.string(), {
description: "the message greeting the user",
}),
});

Finally, we add a summary to our command describing the API operation. This description helps Open AI know when to call this API - so make sure to provide a useful/helpful description.

export const helloWorld = command("helloWorld", {
summary: "This API generates a greeting message when given a name",
path: "helloWorld/:name",
input: HelloInput,
output: HelloOutput
}, async (name: string) => {
return `hello ${name}`.
});

Now that we have our API with an Open API specification, we need to add two endpoints for Open AI:

  1. openai.json - a HTTP endpoint (GET: /.well-known/openapi.json) for getting the API spec
  2. ai-plugin.json - a HTTP (GET: /.well-known/ai-plugin.json) endpoint for getting the plugin manifest

Both of these can be achieved with a command.

Eventual provides an intrinsic ApiSpecification object that can be used at runtime to access the Open API specification. With that, we can simply create a command to serve the openapi.json file.

import { ApiSpecification } from "@eventual/core";
import { OpenAPIObject } from "openapi3-ts";

export const specificationJson = command(
"specificationJson",
{
method: "GET",
// this can be any path
path: "/spec/openapi.json",
},
(): OpenAPIObject => {
return ApiSpecification.generate();
}
);

The ai-plugin.json file can be achieved similarly. It’s a simple static JSON file with some metadata required by Open AI. To see the accepted fields and options, refer to the Open AI Plugin documentation.

export const aiPluginJson = command(
"aiPluginJson",
{
// the URL path for accessing this plugin manifest
// must be this specific string requried by Open AI
path: "/.well-known/ai-plugin.json",
// it must be a HTTP GET operation
method: "GET",
},
(_, { service: { serviceUrl } }) => {
return {
schema_version: "v1",
name_for_human: "TODO Plugin",
name_for_model: "todo",
description_for_human:
"Plugin for managing a TODO list. You can add, remove and view your TODOs.",
description_for_model:
"Plugin for managing a TODO list. You can add, remove and view your TODOs.",
auth: {
type: "none",
},
api: {
type: "openapi",
url: `${serviceUrl}/spec/openapi.json`,
is_user_authenticated: false,
},
contact_email: "support@example.com",
legal_info_url: "http://www.example.com/legal",
};
}
);

We’re now done with implementation and can now move on to testing and deploying.

Testing and deploying

  1. Run the service locally and test with LangChain or Open AI
  2. Deploy the service to AWS and register the plugin with Open AI

To run locally, run the local command from the root of the repository.

pnpm eventual local

This will stand up a server running on localhost that you can then interact with from LangChain or Open AI. See the OpenAI docs for a detailed how-to guide on that.

tip

For an example of how to test with LangChain, check out our example repo here.

To deploy our new service to AWS serverless, run the deploy command from the root of the repository.

pnpm run deploy

This will deploy a best practice architecture consisting of API Gateway (with OpenAPI spec), AWS Lambda, etc. to AWS.

Modifying and maintaining

As you modify your plugin, eventual will always ensure your published schemas are up to date and reflect the latest changes, allowing you to focus on building your service.

Closing

This has been a quick overview of how to build a ChatGPT plugin with eventual. It only scratches the surface on what’s possible with eventual - to learn more, such as how to build event-driven services with eventual’s distributed systems primitives, visit https://eventual.ai, follow us on Twitter @eventualAi and star us on GitHub.

· 8 min read
Sam Goodwin

Choreography vs Orchestration

Welcome to the first blog in a series where we explore Event-Driven Architectures (EDA) and Domain Driven Design (DDD) patterns using eventualCloud - a cloud framework designed for building massively scalable distributed systems.

In this series, we'll showcase how Eventual's distributed systems primitives, APIs, Messaging, Durable Workflows (and more), simplify and standardize the implementation of event-driven architectures on AWS with TypeScript.

Each of the code examples in this series will be available in the eventual-eda-patterns repository.

info
tip

If you're new to EDAs, we highly recommend checking out his resource and this post from Yan Cui (The Burning Monk) for further learning.

Video

What are Choreography and Orchestration

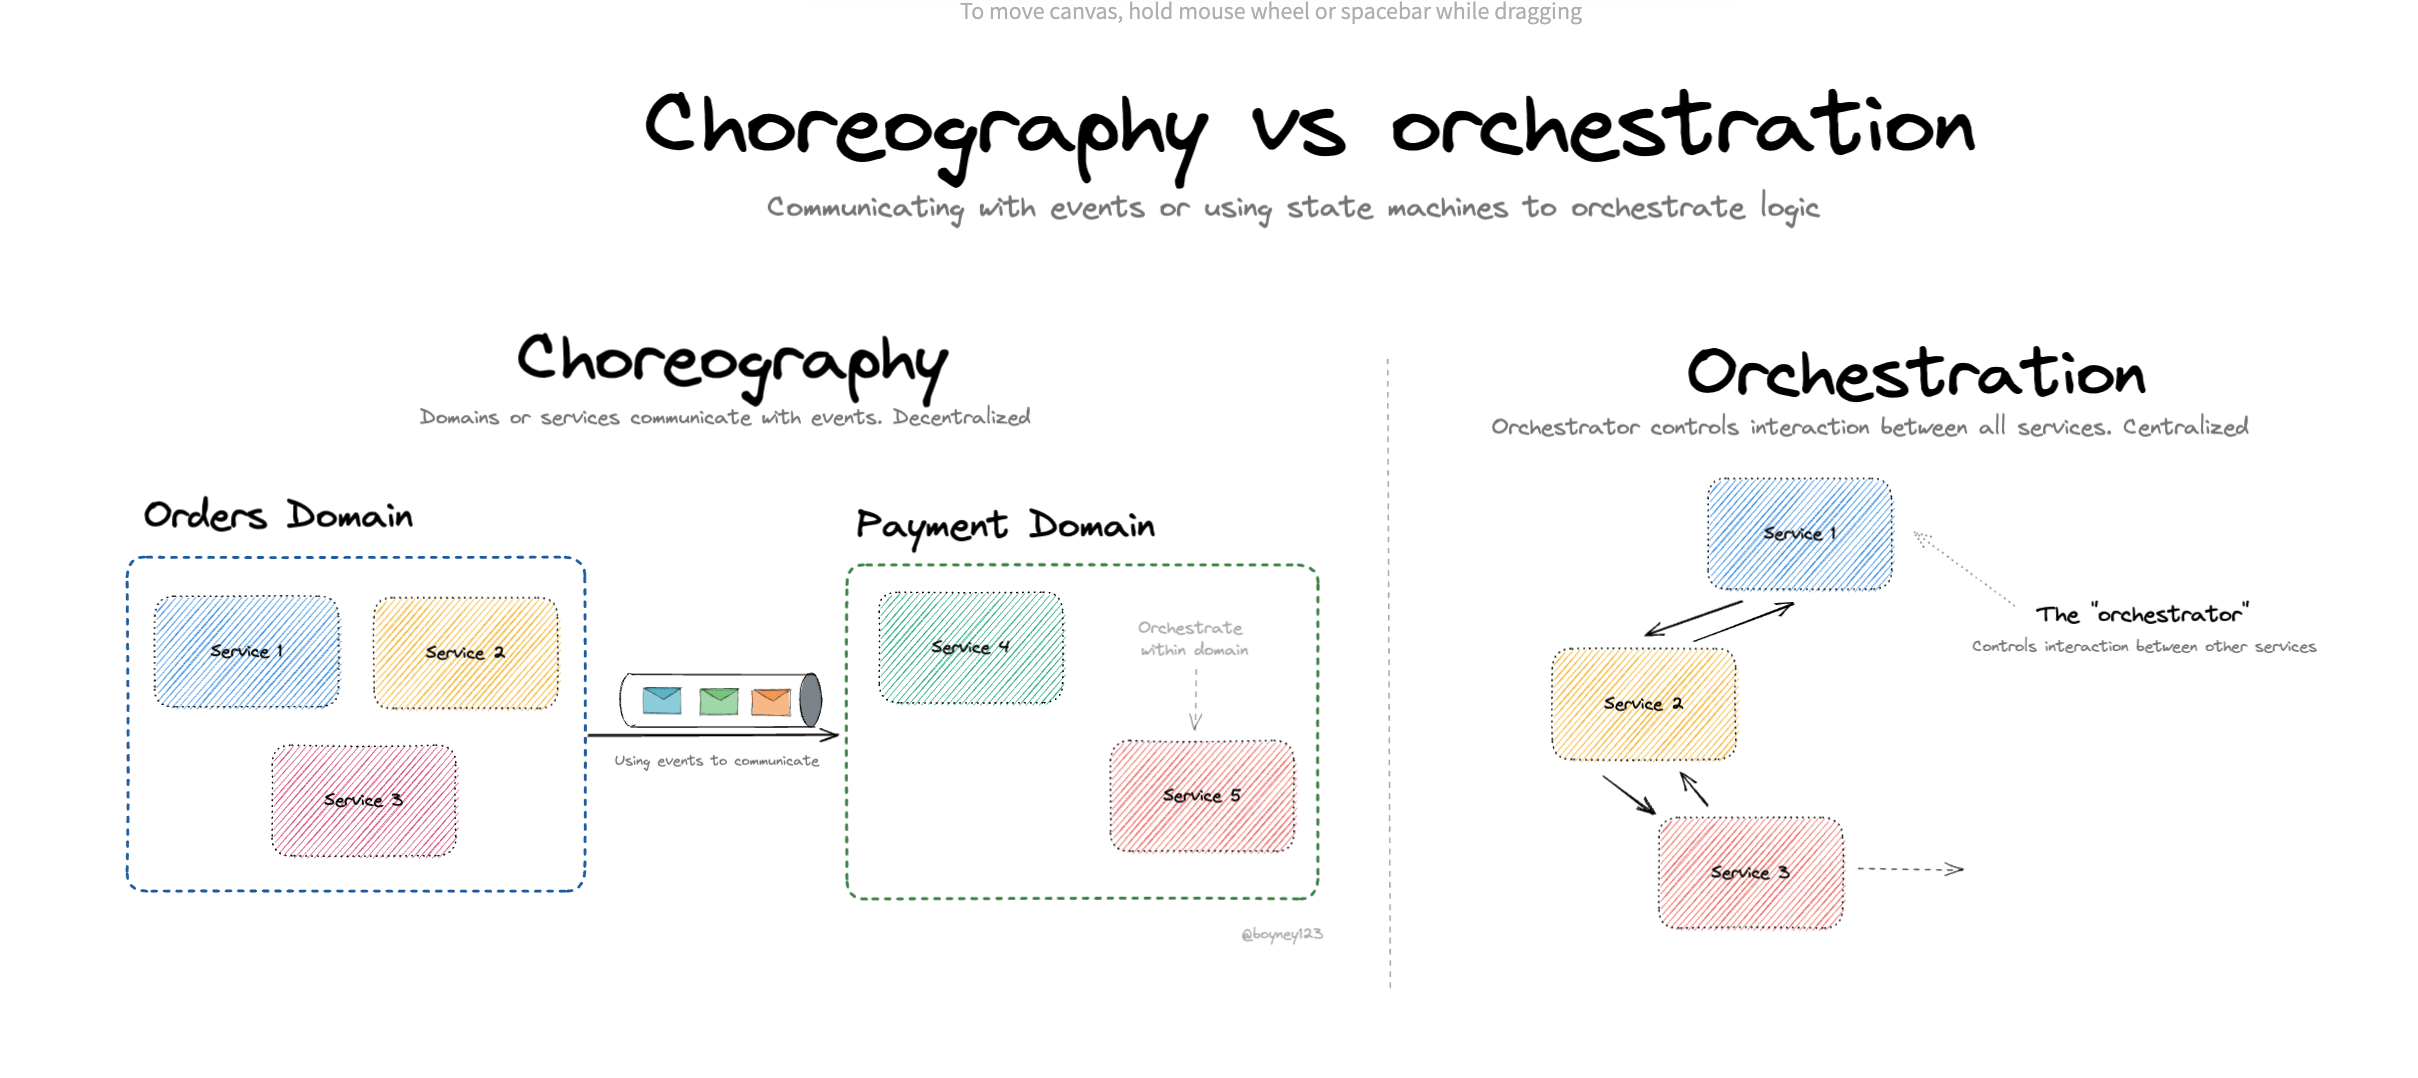
In broad strokes there are two main approaches to organizing communication and collaboration between services in event-driven systems: 1) Choreography and 2) Orchestration.

(source: Choreography vs Orchestration - David Boyne)

Choreography is a decentralized approach where each service is responsible for reacting to events from other services and taking appropriate actions. There is no central coordinator, and the services are loosely coupled.

Orchestration is a centralized approach where a coordinator service (orchestrator) is responsible for directing and managing the communication between services, making decisions, and ensuring the correct order of execution.

Eventual provides first-class primitives in TypeScript to support both of these techniques. They can be used interchangeably and are interoperable.

  1. The event and subscription primitives streamline the creation and configuration of Event Bridge Rules and Lambda Functions, and maintain type safety across publishers and subscribers.
  2. The workflow and task primitives enable the development of long-running, durable workflows using imperative code.

In this blog, we’ll build an example service using Choreography and Orchestration to illustrate their differences and to demonstrate the benefits of eventual.

Example: Order Processing Pipeline

Our example will process an Order in a hypothetical e-commerce service that performs the following steps:

  1. process the Payment
  2. ship the Order to the customer
  3. update the Order status record

Using Choreography

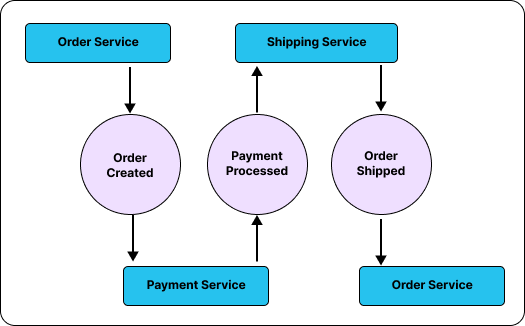
To build this process with choreography, events are published and handled for each step in the process.

  1. When a customer places an order, the Order Service emits an OrderCreated event.
  2. The Payment Service listens for the OrderCreated event, processes the payment, and emits a PaymentProcessed event.
  3. The Shipping Service listens for the PaymentProcessed event, and then ships the order.
  4. The Order Service listens for the OrderShipped event and updates its status

The below diagram depicts this visually - showing three services “ping ponging” messages between each other.

To build this with eventual, we will use the event and subscription primitives.

The event primitive declares an event with a name and schema. Events can then be published and subscribed to.

export const OrderCreated = event(
"OrderCreated",
z.object({
orderId: z.string(),
})
);

export const PaymentProcessed = event(
"PaymentProcessed",
z.object({
orderId: z.string(),
paymentId: z.string(),
})
);

export const OrderShipped = event(
"OrderShipped",
z.object({
orderId: z.string(),
shipmentId: z.string(),
})
);
tip

Eventual heavily promotes type safety and schemas. This helps prevent errors early in the development cycle and improves documentation of the system.

The subscription primitive can then be used to “subscribe” to one or more events by specifying:

  • a unique name to identify the subscription
  • a list of events it listens for
  • and a handler function that processes them

First, we’ll subscribe to the OrderCreated event to charge the card associated with the order and then publish a PaymentProcessed event.

export const processOrderPayment = subscription(
"processOrderPayment",
{
events: [OrderCreated],
},
async (event) => {
// process the payment using an API (e.g. stripe)
const paymentId = await chargeCard(event.orderId);

// emit an event that the payment was processed
await PaymentProcessed.emit({
orderId: event.orderId,
paymentId,
});
}
);

Next, whenever a PaymentProcessed event is received, submit the order for shipping, receive a shipmentId and forward that along as an OrderShipped event.

export const shipOrderAfterPayment = subscription(
"shipOrderAfterPayment",
{
events: [PaymentProcessed],
},
async (event) => {
// call the shipOrder API
const trackingId = await shipOrder(event.orderId);

// publish an event recording that the order has been shipped
await OrderShipped.emit({
orderId: event.orderId,
trackingId,
});
}
);

Finally, whenever an OrderShipped event is received, update the order status to reflect that change.

export const updateOrderStatus = subscription(
"updateOrderStatus",
{
events: [OrderShipped],
},
async (event) => {
await updateOrder(event.orderId, { status: "Shipped" });
}
);

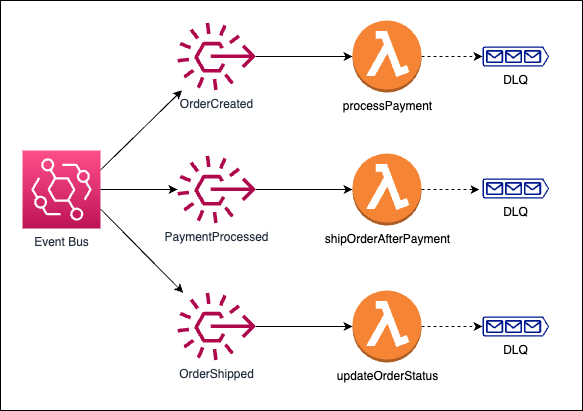
All of these steps are performed independently of each other in response to events published to a durable AWS Event Bus. This guarantees that the events will be handled independently of intermittent failures and enables elastic scaling.

Eventual creates a best-practice serverless architecture for each Subscription - consisting of a dedicated Lambda Function for processing each event, an Event Bridge Rule to route events to your function, and a SQS Dead Letter Queue to catch messages that failed to process.

Using Orchestration

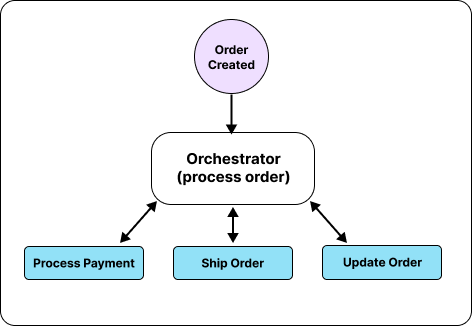
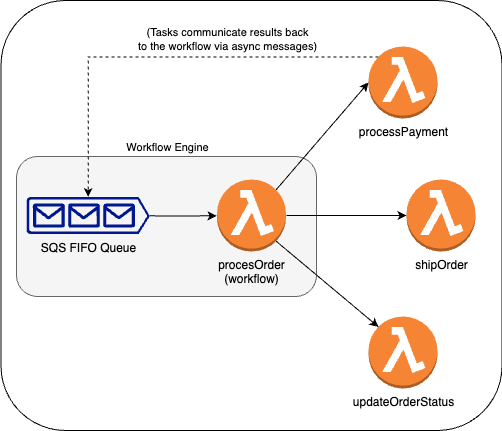
Let’s now simplify this example by using Orchestration. Instead of juggling events between subscribers, we will instead implement a workflow and have it call multiple tasks - this will allow us to centralize and explicitly control the order of execution of each step.

First, we’ll create each of the individual tasks. Tasks are functions that will be called as part of the workflow to do work such as integrating with a database or another service.

const processPayment = task("processPayment", async (orderId: string) => {
// (integrate with your payment API, e.g. Stripe)
});

const shipOrder = task("shipOrder", async (orderId: string) => {
// integrate with the shipping API (etc.)
});

const updateOrderStatus = task(
"updateOrderStatus",
async (input: { orderId: string; status: string }) => {
// update the order database (e.g. DynamoDB)
}
);
note

Our task implementations only show high-level details - implementation is left to your imagination ✨.

Finally, we’ll implement the processOrder pipeline using eventual’s workflow primitive. This will allow us to express that step-by-step orchestration logic as an imperative program.

export const processOrder = workflow(
"processOrder",
async (orderId: string) => {
const paymentId = await processPayment(orderId);

const shippingId = await shipOrder(orderId);

await updateOrderStatus({
orderId,
status: "Shipped",
});

return {
orderId,
paymentId,
shippingId,
};
}
);

When a Workflow calls a Task, it uses an Asynchronous Lambda Invocation to invoke it in a durable and reliable way. The Task, which is hosted in its own dedicated Lambda Function, performs the work and then communicates its result back to the workflow by sending a message to the SQS FIFO queue.

Although workflows appear to be just ordinary asynchronous functions, this is actually an abstraction designed to enable the development of orchestrations in imperative TypeScript (as opposed to DSLs like AWS Step Functions).

info

We use a similar technique to Azure Durable Functions and Temporal.io (called re-entrant processes) except the whole thing runs on AWS Serverless backed by SQS FIFO, S3 and Lambda.

See the Workflow docs for a deeper dive.

A major benefit of implementing workflows with this technique is that they can be tested like any other function. This greatly simplifies maintainability and allows you to really get into the details and ensure your workflow handles all scenarios.

let env: TestEnvironment;

// if there is pollution between tests, call reset()
beforeAll(async () => {
env = new TestEnvironment();
});

test("shipOrder should not be called if processPayment throws", async () => {
// mock the processPayment API to throw an error
env.mockTask(processPayment).fail(new Error("failed to process payment"));

// start the processOrder workflow
const execution = await env.startExecution({
workflow: processOrder,
input: "orderId",
});

// allow the simulator to advance time
await env.tick();

// get the status of the workflow
const status = (await execution.getStatus()).status;

// assert it failed
expect(status).toEqual(ExecutionStatus.FAILED);
});
note

See the docs on testing with eventual for more information on how to simulate and unit test your whole application locally.

Summary

You’re free to mix and match each of these approaches. Workflows can publish events and subscriptions can trigger workflows, etc. You should always use the right tool for the job - our goal with eventual is to make choosing and applying these patterns as straightforward as possible by providing an integrated experience.

Stay tuned for more blogs on EDAs. In the meantime, please star us on on GitHub, follow us on Twitter, and come chat to us on Discord.

A final note: don't forget to sign up for the eventualAi wait-list which enables the generation of these types of architectures using natural language and Artificial Intelligence.